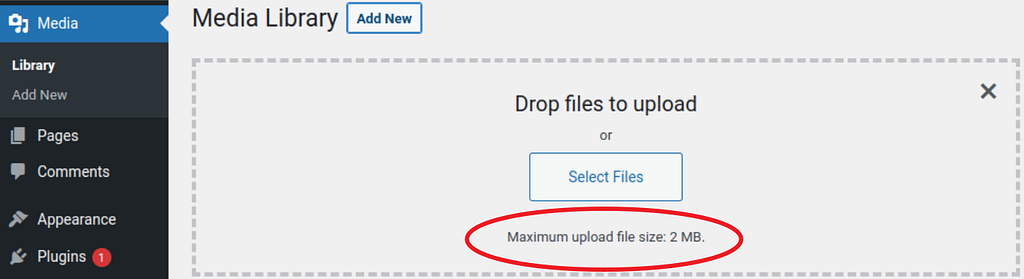
Recently, I set up a server backend where I ran into a common problem of WordPress installations: It was surprisingly complicated to change the maximum upload size for adding new media via the website’s frontend. The consequence is that you cannot upload files larger than the standard setting (2 MB), which is highly problematic for high-resolution images, videos, or even themes, and plugins. The standard solutions you find online do not work for all settings; therefore, I briefly describe the workaround for that issue in this article.
Setting
The following workaround is addressed to people with self-managed servers, where you install the webserver Apache, PHP, and WordPress on your own. This means you don’t have an external provider with a managed web interface where you adjust all your server settings, but you directly access the server via the command line (via SSH). You also need root access to your system, meaning you have complete control, can install whatever you want, and edit all files. In my case, the operating system is Ubuntu 20.04 LTS.
Problem
WordPress runs on PHP which is generally used for dynamic websites and web applications. It is also responsible for the communication between the front- and backend, i.e., it takes care of accessing the database and sends HTTP requests. Therefore offering PHP interfaces also sometimes involves security issues. In this context, PHP provides several global variables controlling and limiting the general usage of that interface. For our purpose, two variables are crucial and need to be looked at:
- post_max_size
- upload_max_filesize
The first variable, post_max_size, sets the maximum size of POST data that PHP will accept, meaning the total size of an HTTP POST request executed by PHP is limited by post_max_size. The second variable, upload_max_filesize, describes the maximum size of a file that PHP is willing to upload (from your local computer to the server via PHP). We focus more on the second variable, because it is displayed in the WordPress media upload interface, however it is limited by the first variable why we should always keep in mind both of them.
Ultimately, these two variables are initially set too low and have to be changed somehow. Of course, we can bypass this problem without using PHP, i.e., by uploading required media differently (by FTP or SCP), but this requires more command line interaction and is generally not as comfortable as doing it directly via the web interface. In particular, when you only provide the backend, and the frontend designer is supposed to access the WordPress interface.
Workaround
The settings of our PHP installation is initialized by a file called php.ini located in the PHP folder of your server: /etc/php/VERSION/cli. Verbosing the mentioned file shows us the following output:
> root@h12920134:/etc/php/8.1/cli# cat php.ini
[PHP]
;;;;;;;;;;;;;;;;;;;
; About php.ini   ;
;;;;;;;;;;;;;;;;;;;
; PHP's initialization file, generally called php.ini, is responsible for
; configuring many of the aspects of PHP's behavior.Solution
...
; Maximum size of POST data that PHP will accept.
; Its value may be 0 to disable the limit. It is ignored if POST data reading
; is disabled through enable_post_data_reading.
; https://php.net/post-max-size
post_max_size = 8M
...
; Maximum allowed size for uploaded files.
; https://php.net/upload-max-filesize
upload_max_filesize = 2M
There, the variables are initially defined. As you can see, their standard limit is quite low and is not enough for most applications. Some blog posts and articles I found recommend to change the variables in that file to our required upload limit. However, changing the variables in the php.ini file is not sufficient because later, it is overwritten by the Apache configuration. Therefore, we have to edit the php.ini file in the Apache configuration folder within your PHP settings in: /etc/php/VERSION/apache2/php.ini
There, we have to adjust the variables:
root@h12920134:/etc/php/8.1/apache2# vim php.ini
...
post_max_size = 256M
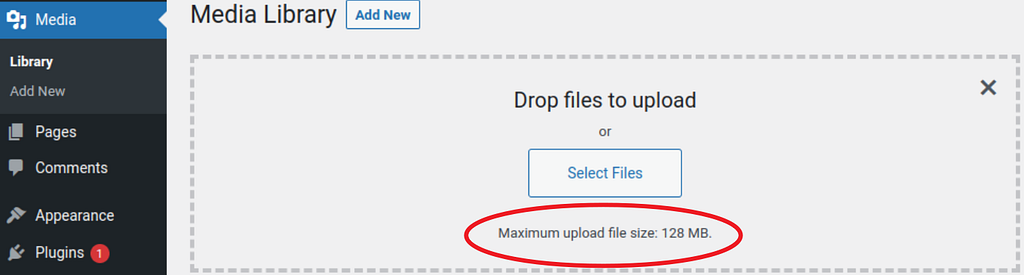
upload_max_filesize = 128M
After changing the settings, we have to reload the Apache server:
root@h12920134:/etc/php/8.1/apache2# /etc/init.d/apache2 reload
After that, the changes are applied in WordPress:
Other provided solutions
To complete this article, I compare my solution with the common ones I found online and point out why they usually do not work in our setting. For example, I stumbled over wpbeginner’s or kinsta.com’s article about the topic where they recommend the following:
- Set the variables in the .htaccess file of your web application
- Set the variables in the wp-settings.php file of your WordPress installation
- Set the variables somewhere else in the WordPress folder structure
- Change the php.ini version of the PHP installation
- Contact the provider of your web space
Unfortunately, in my setting, all of these set variables are later overwritten by the configuration file that is located in the Apache folder /etc/php/VERSION/apache2/php.ini. If this is not adjusted, it is not sufficient to define variables in your local WordPress installation.
So, an important note: If you use WordPress differently or only access it via a web interface / an external provider, I recommend checking out their articles in case you run into this problem, but ultimately, they do not cover all scenarios.
Thanks for reading! Let me know what you think of this article, and text me if it worked in your case!